True to expected Bank Holiday form, the weekend was spent on a DIY project. However I wasn’t out spending my hard earned cash on flock wallpaper (at £50 a roll) but instead a project to save us a material amount of £ each year as well as providing some fresh healthy food.
With the fish given away to my brother in law two weeks ago, the pond conversion could finally begin in earnest.
Clearance
Emptying the pond and getting it ready for topsoil wasn’t as easy as I envisaged.
1. The first problem I hit was that when I opened the drain (which dumps the water into an old unused cesspit) was that it only drained half of the water out. This meant I had to bail the remaining 2.5′ of water out by hand – no mean feet when the pond is over 5′ deep. And yes there was a point when it was too deep for wellies and too shallow to lean over/reach in!
2. It soon became clear that the builder had done an annoyingly thorough job and had lined the pond with fiberglass (manually laid not a prefabricated liner). This needed to be broken up in order to allow drainage through the bottom of the pond.
3. Beneath the fiberglass I unsurprisingly found a layer of cement/concrete. I was hoping to hammer and chisel though a thin layer of cement in order to give the bed some decent drainage. What I didn’t factor in was that the guy had laid 10″ of steel re-enforced concrete!
After much swearing I ended up having to hire a kango for half a day which made the job much easier. I kangoed down to the steel grid then used a borrowed angle grinder to cut the steel out before kangoing down through the final few inches of concrete.
4. Finally I got through the concrete and hit a thin layer of sand then heavy clay which contained lots of flints. In order to prove this was the subsoil I hoped it was I filled the trench with a few inches of water and checked it drained over night, which I was mightily relieved it did!
The Fill
In order to further help drainage I filled the bottom of the bed with a mix of scavenged bricks, concrete, broken ceramic tiles (from a recent DIY project) and other assorted rubble. Initially I began sourcing more rubble and top soil from freecycle, picking up car loads form various local people in the area. After a couple of weeks it was clear that it would take me all summer to fill the void. The amount of rubble/soil I could fit into one car load was tiny in comparison to the hole I was trying to fill. Eventually I decided to resort to paying for top soil.
Local landscape gardeners were quoting me £50-60/m2 making it around £480 for the 8m2 I needed which seemed too much capital outlay for what was supposed to be a money saving project. Finally I found a local skip company that sells screened topsoil for £12.50m2 which was more like it. Even if it wasn’t the best grade I’m more than happy to improve it with homemade compost and leaf mulch over the next few years.
The filling of the pond was made much harder by the fact that the pond is situated in our back garden that is on accessible via a several steps, a long winding narrow raised path about 20m long. This meant barrowing/bucketing all the materials in by hand.
Eight tonnes is a hell of a lot of soil when moving it manually like this. Thankfully my obsessive side kicked in and like a man possessed I managed to get it all done in 12 hours straight on Saturday, with only one notable break for some poached eggs. On Saturday night I slept like a dead man.
After letting it settle for a couple of days (with some heavy rain) I decided that some soil conditioning was required if I was to get growing this year. Having forked in all the homemade compost and leaf mulch I had, I resorted to buying a few bags of well rotted manure too.
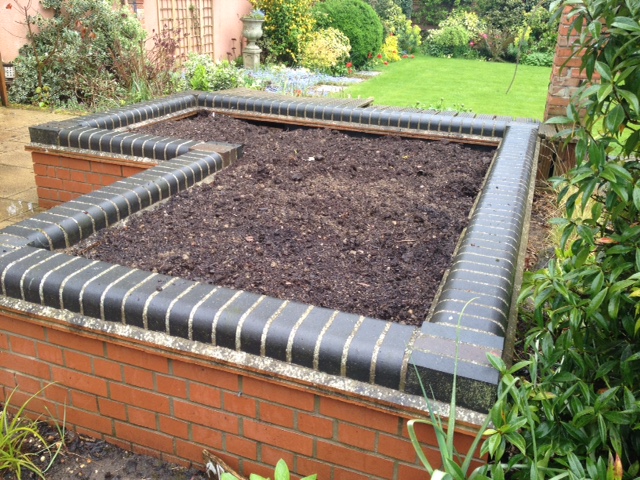
The end result is what I hope will be the mother of all raised vegetable beds…
 1.
1.
Total Cost
- Kango Hire: £29.50
- Top Soil: £100
- Pre-rotted manure/soil improver: £20
- Total: £149.5
The Benefits
So I’m making a risk free annual saving of £423 per year by not owning fish and I have what should be a productive vegetable patch that is easy to maintain and will provide lots of enjoyment to boot. The conversion cost a grand total of £149.50 and has been an excellent project in terms of allowing me to get my soft office hands dirty, enjoy some hard physical work in the spring sunshine and get that glow of satisfaction that completed DIY projects provide.
The next couple of weeks will see the raised bed get planted up with a variety of different vegetables. I’m also pondering on some soaker hoses to aid watering however given the depth of the soil in the bed I’m hoping it should not dry out too quickly.
I will hopefully report back later in the summer with gratuitous pictures of a monster harvest of vegetables that will help us in our efforts to maintain cheap healthy diets.
Notes:
1.Please excuse the Romanesque urn in the background…another legacy of the former owners of the house 😉
Leave a Reply